1st finished project of 2015 PART 1
どうも!Welcome to my project log.
This is a log of my recently finished plamo project. This is a GunPla, specifically the HGUC 1/144 RX-78-GP02A 'Physallis' with its MLRS option.
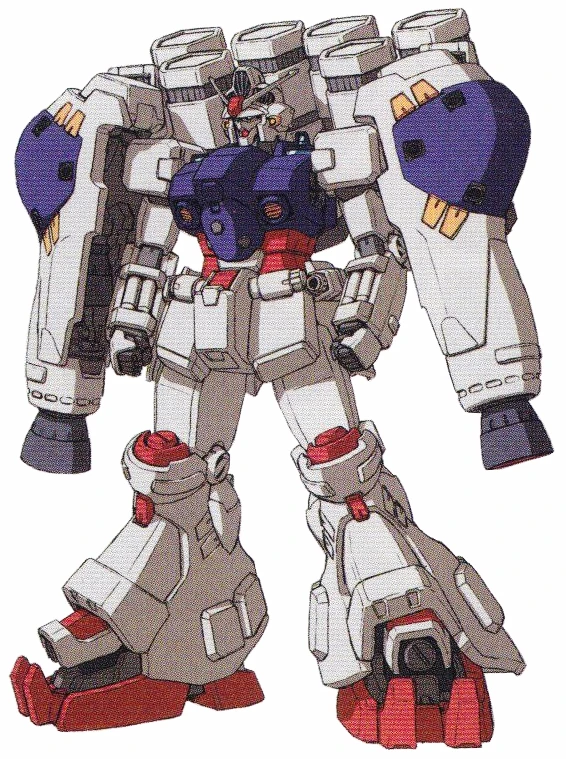 |
| Picture from Gundam Wikia This is the original color scheme for this mobile suit |
Want to skip the boring reading?
Click here for the goodies instead! -> GP02 Finished Product
 |
| Box art with some of the runners |
Info:
- Build type: semi-straight-build (converted some seamlines into panel lines)
- Start Date: January 15, 2015
- Finish Date: May 17, 2015
Build Preview:
Here's a bad snapshot of the finished product.
Build philosophy:
I currently build Gunpla on a straight-build basis. This is because I still lack the skill and time to learn the skill to do major customizations. Right now, I only use basic techniques and currently, I want to perfect my painting process and techniques. For me, establishing my best painting discipline is better than knowing how to customize kits (I mean, for now) because I have seen a lot of builders customizing their kits (e.g. kit-bashing, pla-plating). While I have seen a lot of builders having epic results on these activities, more often do I see builders going over the top on their customizations which only they themselves see as epic. Aside from the disproportionate kit-bashing a lot of these I call 'shortcomings' or 'failures' results from poor paint jobs (like bad color combinations, bad painting practice and poor painting skills). Given those thoughts, I decided to not make those same mistakes and poor practices - before I delved into painting, I researched a great deal around the net and watched a lot youtube vids about painting plastic models. I learned a great deal from that research method, I probably learned a great deal more than if I asked already answered questions in Facebook groups or forums (lol).But enough about that. For this project, I decided to airbrush paint using both hobby-grade and industrial-grade products. The color pattern I used was military-themed which means I eliminated anime-ish and/or cartoonish colors that you will not see in real-life military applications. I primarily replaced all yellow colors and stuck to shades of gray. The color blue is not a problem, but for the red color, I decided to darken it. Red is the first color the human eye can detect and in military situations becoming the first thing your enemy sees is a no-no.
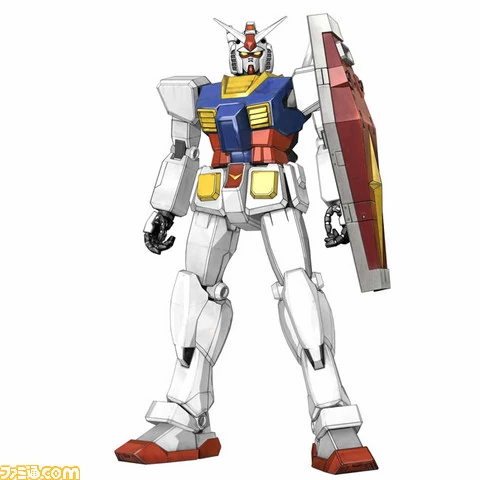 |
| Picture linked from Gundam Wikia Those bright yellow and bright red colors are targets for enemies on the battlefield |
It is also worth mentioning that I decided to try my hand in shading techniques (e.g. pre-shading, highlighting, etc) for this project. I saw videos made by builders of military models and miniatures and I found them interesting and also eye-appealing. With techniques from these flavors of model painting, I took a shot to see how it will go.
 | ||
| Image from http://www.ipmsstockholm.org This is the result I basically aimed for |
The Build
I never thought before that I will be documenting my projects in this way, and so I failed to take photos of earlier steps I did so let me just enumerate:- I washed the runners by soaking them in clear water mixed with dishwashing liquid and used an old toothbrushing to lightly brushed the parts. After then, I rinsed them clean under running water and left to air dry
- I proceeded to assemble the parts (i.e. cleaning nubs, etc) and trimming pegs to enable me to disassemble them later if needed.
- Since this is an HG kit, it is necessary to remove seamlines for parts that are supposed to be a single solid object. A lot of modellers use a lacquer-based putty to smooth the seam out of view but that still does not eliminate the seam itself, only hide it under it - there is a possibility that it might open again if the parts are put under pressure. For me, the best way is to use plastic cement - brush this on the parts you want to cement together (put a little bit more than usual), let it stand for around 10 seconds for the plastic to slightly melt, then put the parts together and clamp them to let the melted plastic ooze a bit. After a few hours (or 24 hours for me), sand the parts clean. This method eliminates the seam entirely, fusing the two plastic parts into one solid part.

- I actually assembled the head first. I first finished painting the face plate of the Gundam: painting the eyes, etc. I did this because I need to remove seamlines on the head. But before removing the seamlines, I first masked the face to protect it until all the other painting is done.
- After all sanding and seamline removal is done. I dusted off the parts as clean as I can, for some parts are re-washed them to remove oils from my hands when I handled it. From this, the plastic is now ready for painting.
Priming
Let me just give an advice to everyone: Please prime your kits properly. I have experienced paint peeling off just because I skipped this step. In my experience, the best primers are the surfacer-primer types. These basically are 'paint' that puts a new layer of surfacing on the plastic which mutes the original color of the plastic and also helps the paint you will apply adhere to the plastic better. Surfacer-primers will also reveal large defects and/or scratches you missed in the initial cleanup. Using primers will also prevent your paint from peeling off when you do masking.
In my quest to make myself independent of brands, I used this VHT primer.
 |
| VHT Prime Coat |
I also would like to recommend this primer from RJ London:
 |
| RJ London Anti-Corrosion Primer Also available in Grey and Rust Red |
There is also this one, which I used before: Bosny Plastic Primer

This primer works well too and it has application to plastics as its main use (PS, ABS, etc). Main problem is that this is transparent and also there is a time-limit to its effectivity. After 10 minutes, you have to spray the color you want to paint your kit immediately. If you went past 30 minutes without painting anything over it, you will have to respray this as the primer is no longer effective past that. This is more an adhesion promoter for paints rather than a surfacer.
All of the above I mentioned are spraycans, however. I used spraycans for this project because I haven't found...or rather I was not yet confident in airbrushing primers of any kind. I actually tested airbrushing a decanted RJ London Primer, but it became very rough and cleanup was such a hassle so I abandoned the idea for the time being and just went for a spraycan approach. But airbrushing primers gives you control over application so if you'd like to use your airbrushing for priming, I believe one of the best one to use is still this:
 |
| This also comes in Black |
Now, this does not come airbrush ready, so you will have to mix this with Mr. Levelling Thinner. Start with a ratio of 1:1 and I recommend spraying it with a PSI of 8-10 or with 0.5bar. You could also use lower grit values like the Mr. Surfacer 1200 which gives you more microfillers to cover larger and/or deeper scratches.
Next, I believe is the best so far in terms of primers you can airbrush.
 |
| The two larger bottles in the middle are the primers |
Before moving forward, I think I also need to tell you what not to use as primer, THIS: Bosny Primer Grey
 |
| This is just a primer-colored paint |
- Spray the Bosny Plastic Primer as instructed
- After 10 minutes (and not more than 30 minutes), spray this over.
- Viola, "priming" finished
Moving forward, here are the parts mounted for priming:
 |
| Parts mounted using trimmed runners with alligator clips attached. |

After securing the parts on the mounts, I just sprayed the VHT Primer on the parts. I just sprayed 2 coats and kept everything thin and even.

So that basically ends the first part of project.
The VHT Primer, I have never seen that before. Where did you purchase it?
ReplyDelete@Illsteir, I got the VHT Primer from True Value. It is a hardware store in Trinoma and, I believe, is a sister company of Handyman. The last time I checked, they also now have a VHT Grey Primer which has the same color as the Alclad Grey Primer aside from the White and Yellow ones.
DeleteI work near that area. Thanks for the info!
DeleteGlad to help :)
DeleteOh nice blog you got bro! Very informative... Bookmarked ahaha!
ReplyDeletebtw Bosny Primer is a primer, it was confirmed by Bosny...
@kuyayobs
DeleteThanks much for the support!
Regarding Bosny Primer - thanks for confirming as well. At least now I have another option for priming plastics. Though I like Alclad Primers better than Bosny. Bosny's primer grey still gets scratched and reveal the bare plastic underneath it. Primers like Tamiya and Alclad are very durable (I accidentally scratched the paint and it only revealed the primer layer). Nonetheless, thanks for confirming Bosny's primer. It works really well in adhering paint :D
Yeah, Maybe there are batches of good and bad bosny primers.., I experience one time having a Can of Bosny Primer that goes off easily when applied... even if I tried it to decant and shoot it in to my Airbrush, it easily get scratch.. Right I'm using bosny primer as fillers for some gaps coz it's really thick, it saves a lot of Mr. Surfacer 500
ReplyDeleteYep, I now use Alclad's primer as it tends to be more cost-efficient compared to the Mr Surfacers. It comes airbrush-ready and fills gaps as good as the Mr Surfacer 1000 or 1200.
DeleteYep, I now use Alclad's primer as it tends to be more cost-efficient compared to the Mr Surfacers. It comes airbrush-ready and fills gaps as good as the Mr Surfacer 1000 or 1200.
DeleteYep, I now use Alclad's primer as it tends to be more cost-efficient compared to the Mr Surfacers. It comes airbrush-ready and fills gaps as good as the Mr Surfacer 1000 or 1200.
Delete