Ithaca!
どうも!I finally finished this project! It was finally married to the Flight Craft System and turned this Odysseus into the Penelope. Let's see how it went.
Last time I logged something about this kit, only its base form, namely the Odysseus, was in finished form. But now, I finally finished the remaining parts to put this in its final display form - the Penelope. Now, we discuss or review the kit itself in its finished form. Note that the pictures here are just taken with my phone's camera. Better pics were already taken in my younger brother's studio and I will put up a separate post for that. So let's go.
If you want to see the in-box review click here!
RX-104 Odysseus
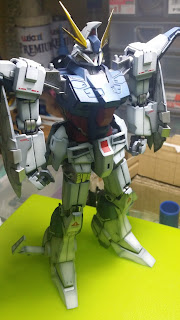
Overall, the kit offers a very good color separation. Color separations are better than the normal Bandai 1/144 or HG kits. Painting this kit is an easy one but of course you will have to do some modifications to address seam lines. To start with, I would call this kit more like an 'HG+' - it technically has the engineering of the early MG kits by Bandai. It also offers nice details that you won't see in Bandai HG kits not to mention the inclusion of water-slide decals. The plastic used was ABS, which can be beneficial as it made the kit's cost relatively cheap but I think it also has downsides as the properties of ABS were probably not taken down properly and distorted some details and caused minor issues in the fittings - or maybe it has something to do with sub-par casting methods used by MC.The kit gives you the choice to build and finish it in its base form, the Odysseus. You could actually finish it first in this form but you might want to assemble it in a way that it is prepared to receive the Penelope's parts.
An example are those shoulder joint parts. Basically, you are give two sets/pair. 1 pair for something to connect the Penelope parts to (like in the picture above), and another pair that is basically shorter and doesn't have those pegs. The shorter pair actually makes the shoulders look more natural and not awkward-looking like above. I generally skipped those pieces as, of course, I intended to finish it in Penelope form.
Those shoulders don't look that bad, really. It kind of looks hulking but not too much.
Another option part you can use is the back-pack. It has a different back-pack like above when it is in Odysseus form but you will have to remove it to make room for the Penelope's parts. But it is nice for it to be provided, nonetheless.
Another good thing about the kit is that it has an action base provided. It's technically the same one provided in the Xi Gundam released before it and it serves as the base for the mobile suit and the Minovsky Particle shield clusters later on. Just be careful with the parts for the base - it is known to break and it already actually formed stress marks in my case.
Also in its Odysseus form, this will be the only time that you will be able to pose it properly. When we took photos in the studio I had to first do it in this form so I can feature what few poses it can do. Once I attached the Penelope parts, it is doomed to be an impressive brick. I will show the Odysseus in its paces on a separate post.
Penelope Waiting
Now of course, the RX-104 is more popular in its RX-104FF form, or what I would like to call its intended form. In the story, the Odysseus docks with the Minovsky Craft Flight System and turns into the Penelope.The parts are actually detail-rich design and the decals added even more to the appeal of the kit.
Like the base parts, the Penelope parts are built such a way that the seam lines will be hidden by another overlapping part. Later on, I will show what parts will need seam line attention.
The Penelope parts are sectioned as such:
First, the leg armor parts:
Next, the abdominal parts:
The abdominal parts are made of a chest piece where the lower body armor will connect to. Details were omitted on the lower body armor, sadly. The lower body armor is supposed to be a dispenser of the funnel missles. Funnel missile pods were supposed to be under those lower body armor pieces, but in this kit there will be none.
Next are the shoulder parts:
The shoulder pieces are the 2nd largest parts of the kit. It technically is one of the most prominent pieces on the mobile suit and it is good that it was done nicely by MC. However, some details were also omitted. Firstly, those fins on top of each shoulder, they were supposed to be beam cannons like those in the Sentinel Gundam, but here there are no indications of any holes or cannon details. MC just made them as plain fins, it is articulated but the articulation is wasted since the cannon function is non-existent.
Another thing is that the shoulders should also have funnel missile containers, like that in the Xi Gundam - too bad it did not have that detail. The shoulder armors are technically a big solid part and nothing else.
The simplest component of the Penelope is technically the Beam Rifle:
You just have the white parts (2 halves put together) a single blue piece. Nothing special, really.
In contrast we have the biggest part and one of the most complex section, the backpack:
Left alone, it is the longest component and also adds quite a significant weight to the model. Nonetheless, it was one of my favorite parts in this project. It is meant to connect with the abdominal parts as you put it on the Odysseus and technically will rest on the shoulders and on a supporting piece at the back of the model.
In the novels, the design is that the Minovsky Craft Flight System can be transformed into a separate mobile armor that looks like a dragon. It consists, of the backpack, abdominal armors, shoulder armors and leg armors. Sadly, you won't be able to do that with this kit.
I believe, all the details and gimmicks that MC skipped are present in the Mechanicore 1/100 version of the Penelope. But for me, those missing details are okay, due to the reason that I won't be spending my time in the future articulating and altering its pose while it is on display.
Another accessory is the Minovsky Particle Shield clusters. They are originally just plain transparent parts, but I painted them with Bosny Honda Blue, thinning it well enough so I can make varying shades of blue.
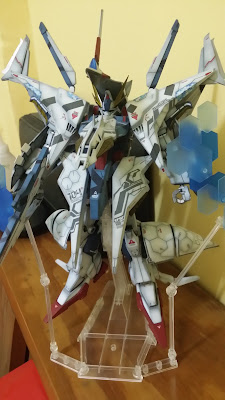
Putting them all together, here is the Penelope in its intended form:
Here is the suggested look if you paint the kit (as suggested in the instruction manual):
This is how I finished mine:
Primed with Alclad Primers, painted with a combination of Alclads for the metallic parts and decanted Bosny Spraypaints for the other parts. Finally, topcoated with Alclad's Flat Klear Kote.
Just note, once it is turned into the Penelope, it's technically set for life. A lot of the articulation goes out the window. Trying to pull off some poses will be very frustrating as you might have a lot of pieces falling off specially the lower body armor. I personally got frustrated and decided to abandon some posing ideas during the photoshoot. Nonetheless, I consider this like the MG EX-S Gundam - it's size and imposing appeal are enough to make this kit a very impressive one.
Tips on Building
This is, in essence, an HG kit or an HG+ kit. It borrows engineering techniques used in the earlier MG kits and so, it will have seam lines (which you will have to clean or putty up). You will have to use ABS cement and/or spot/basic putty to cover them and make them look as a single piece instead of two halves put together. The following are the locations which you will need to focus on in terms of seam lines:For those above, I decided to just turn them in to panel lines instead, adding an extra points of detail to the model. It actually made painting easier.
The part above in the leg armor should be cleaned of the nasty seam line. It simply will not look good and will screw up that overall look. After all, a decal is meant to be put there.
The feet also needs cleanup. It simply looks better with the seam lines gone.
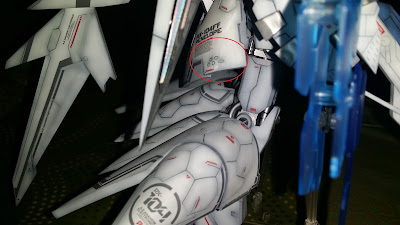
One thing to consider are the skewed details that you might find like the below:
One of the circles was skewed and almost erased/faded. I think MC made a poor choice of first sculpting this part flat at first, then curving it into a concave shape causing those shapes to be stretched and thus destroying the intended pattern. I suggest, puttying the skewed circle to remove it altogether or use a small brass tube to correct the problem while the putty is still wet.
Keep your eye out for mold-lines or what they call parting lines. Parting lines are technically small but noticeable flash lines on some flat parts caused by the molding process. It appears usually on where the casting molds meet and if the molds were not aligned properly, they will be more evident and sometimes skew some details. This kit also has those, and so be prepared to sand the parts properly.
Summary
Pro's and Con's to close things up:PRO
- Nice details, no shortage of panel lines
- Adequate color separation, easy to paint than the usual Bandai HG
- The final look is very impressive and nicely represents the original design from the novel
- Early-MG engineering, less seam lines to address
- ABS plastic
- Accurate scaling - the kit is 19-20cm tall, that is accurate in the 1/144 scale of the original 32m height.
- Extensive decal sheet that gives additional details and beauty to the model - you will be left with a lot of spare decals which you can use for other model projects.
- Relatively cheap
- Some skewed details due to the casting methods used
- Some fittings can be too tight, modifications might be required to get them perfectly aligned
- Omitted some gimmicks and details that was originally meant for the Penelope (i.e. shoulder cannons and funnel missile dispensers)
- Limited articulation
- Box is too big - if they divided the large parts into smaller snap-fit parts, it will only result to more runners and will not need styrofoam to protect any large parts making the packing more compact and reasonable. The box seems to have the same volume as the Mechanicore 1/100 version due which is technically unnecessary and could have been avoided
- Sink Holes are present - sink holes are a parts in the plastic where the plastic droops and sinks down specially if there are snap-fit holes beneath it.
- ABS plastic - yup, ABS is strong and cheap, but it can also be a disadvantage for small details as it is prone to sink holes if the casting is not done properly.
If you will just be snap-building, I suggest getting the Mechanicore 1/100 version - that kit is just the beast and I believe so far the best model kit based on the Penelope, even if left unpainted.
Rating
For a 3rd party kit, it is even better comparing with my experience with Dragon Momoko's Tallgeese III, so I give this (scale of 1 to 10 with 10 being the highest):
7/10
Stay tuned for the better photos :D


No comments:
Post a Comment